Post-Production Guide on When To Upscale
It's during the initial image stabilization process that the image's grain gets seriously remapped, thus the upscaling process should be done along with the image stabilization. The reason for the "remapping" is that the image stabilization process necessitates an enlargement of the image by 4% — from 100% to 104%. Once stabilized, that enlarged image gets cropped back down to its original size of 100%. Then, a very light sharpening is performed in order to retain the grain's sharpness.
To test how the grain structure is influenced by image stabilization and upscaling (during the upscale process), I produced a sample clip of a 2K transfer, and a 4K transfer, then placed them side by side.
How I Made My Sample Clips
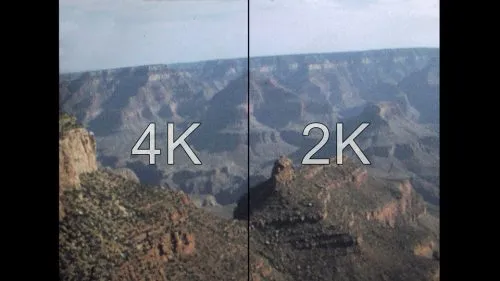
In the image below, on the left - 4K side, I performed the image stabilization process within a 4K project (within my editing software - "Edius".)
For the right - 2K side, I performed the image stabilization outside the 4K project, within a separate 2K project.
Here are the steps in detail:
On the 4K Side
I created a 4K project, into which I imported a 2K clip. The 2K clip was automatically upscaled to fill out the larger 4K frame. Then I applied the image stabilization process to the clip, including some minimal sharpening.
On the 2K Side
In a separate 2K project, I performed the image stabilization and minimal sharpening.
Later, I opened the above 4K project, into which I imported that already pre-processed 2K image-stabilized clip.
I then upscaled the 2K project and placed the 4K and 2K side by side, as seen below.
A side by side 4K / 2K composite is a large 611 MB file — the file is a 4K resolution size (3840 width by 2160 height). Note that the quality of very fine grain can really only be judged in a video clip that is being played back in real-time. A still image does not work ideally for this demonstration.
Click and zoom in to view the image with a 1:1 pixel-to-display ratio. Notice how doubling the grain size has made the grain appear splotchy. You might also observe that the 4K image appears slightly less cloudy.
Theoretically, one would expect the 4K side to retain more of its fine grain structure. However, in my assessment, the improvement was marginal.
Assessing Transfer on an HD Monitor
One can only discern the difference of this 4K sample by viewing it on a 4K monitor. Since most people do not have a 4K monitor hooked up to their desktop computer, I decided to provide you with a link to the file so that you can download it onto a USB stick. If you have access to a 4K monitor, use it to compare the two transfers.
If you only have access to your computer's monitor, here is a 1920 × 1080 frame center portion of the 4K file. It is the red rectangle seen in the image below. You can play this clip on your desktop to compare the difference in grain. The grain is the same as what you would see on your 4K monitor.
The sample below is only a zoomed-in, close-up portion of what you will see on your screen. The final transfer will not look like this. However, this sample will give you an idea of the difference between a 4K transfer and a 2K transfer. The 4K transfer does bring more crisp edges, but it adds substantial blotches of grain patches during live playback. It looks busier than the 2K version, and the induced crispness actually distracts the viewer.
The red section is cropped to 1920 × 1080 pixel size for viewing on a desktop monitor.
Download MP4 Samples
To download the center, zoomed-in, 2K section of the 4K sample, click here. It is 303 MB, so it will take some time to download.
To download the full-size, 4K sample clip, click here. (Again, this is a 611 MB file)
These sample clips have been encoded using the new "High Efficiency Video Codec" aka H.265 codec. Some older players might not be able to play back this type of mp4.
Considerations and Conclusions
Bottom line: If you have 8 mm film, we do not recommend that you get a 4K transfer.
1 - The benefit of getting a transfer in 4K is not very noticeable. Only a trained eye might see a difference, and it costs far more than we charge for 2K.
2 - If you will be considering our image enhancement option of grain reduction — “debris removal”, as we now refer to it — you do not want a 4K transfer. Since with a 4K transfer you are after the grain, we would not apply any grain reduction to the file.
3 - If you are going to want to share this large file, it will first need to be highly compressed. In that compression process you will lose all the benefit of the grain captured in a 4K transfer!
4 - If you want to be mindful of your carbon footprint, 4K transfer is not a good choice for converting your films. It takes a tremendous amount of electricity to process these very large files.
Conclusion: A 4K transfer will not benefit the image captured from 8 mm film. The finest grain might look a bit sharper; but — for all the reasons explained in detail above — the slight improvement in grain quality does not usually justify the extra cost to convert to 4K.
Part 1
Part 2
Part 3
Part 4
Author: Nathaniel Courtens